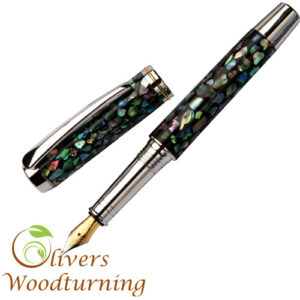
This Premium Classic Fountain and Rollar Pen Kit Assembly Guide is written with the Rotur kits in mind but can be used as a general guide for most types of kits.
Required Accessories:
- 7mm Long Mandrel.
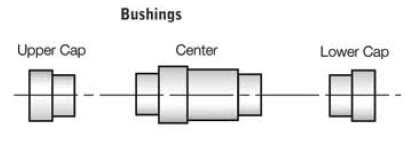
- 3 Pc. Bushing Set.
- 10mm Drill Bit.
- 10mm Barrel Trimmer.
- 2 Part Epoxy Glue or InstaCure (cyanoacrylate glue).

Preparing the Blanks
- Cut 3/4″ to 5/8″ square blanks to the length of the brass tubes (add 1/16″ for squaring off).
- Drill a 10mm centre hole along the length of each blank.
- Spread glue over the tube. Insert into the blank with a twisting motion to spread the glue evenly inside.
- Centre the tube along the length of the blank.
- When the glue dries, square the ends of the blanks. Use a 10mm barrel trimmer or belt/disk sander to trim the wood down flush to the end of the brass tubes.
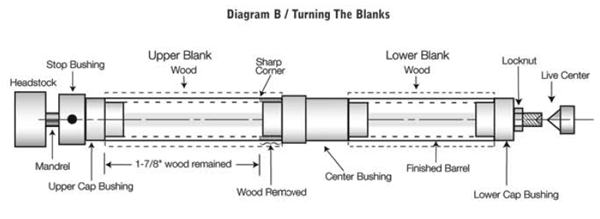
- Wood removal, this is important for the centre band connection. As shown in diagram B.

Turning the Blanks
- Place the stop bushing onto the mandrel hand tight.
- Place the cap bushing (the longer one) wide end first.
- Then slide on either blank. Place the centre bushing (wide end first) on the mandrel. Slide on the other blank and follow with shorter tip bushing, narrow diameter first. Thread on the lock nut hand tight. Bring the tail stock snug with the mandrel (Do not over tighten, it could damage the mandrel). Slide the stop bushing toward the blank adjusting to remove spaces. Then tighten the set screw and tighten the lock nut.
- Turn wood down, flush with the bushings using a lathe chisel and gradual higher grits of sand paper.

Removing Wood for Centre Band
- Use a pencil to mark 1-7/8″ from the upper cap bushing on the upper barrel. Use a parting tool to remove the excess wood down to the brass tube. Be careful, you must retain a sharp 90° corner at the end of the upper blank when you remove the excess wood.
- Sand both blanks then finish the blanks with your choice of polish and waxes.
Fountain Pen Assembly – Assembly of Body Barrel
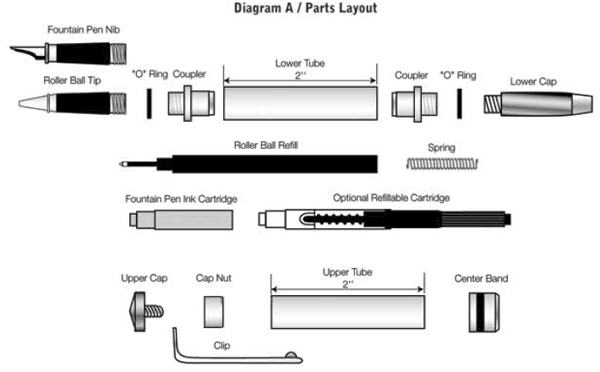
- Line up and identify finished parts according to diagram A.
- Slip the “O” ring over the thread of the coupler into the groove.
- Press a couple into each end of the barrel.
- Screw in the plastic end cap (either end).
- Push the ink cartridge, narrow end first, into the the open end of the nib assembly to the end to make an opening and allow the ink to flow.
- Finally, screw the assembly into the barrel.
Fountain Pen Assembly – Assembly of Cap Barrel
- Press the cap nut, recess end first, into the flat end of the barrel.
- Press the centre band, square end first, over the exposed end of the brass tube to the wood. Use a drop of glue if necessary.
- Insert the threaded stud on the upper cap into the hole in the dip
- Thread this assembly tightly into the cap nut.
Fountain Pen Assembly – Operating the Pen
- The fountain pen is ready to be used. A quick 1/4 turn will screw the ends together. Then using the pen, screw the cap over the body end and always keep the nib covered when not in use to avoid the ink from drying up.
- Tip: Stroke the pen nib fro the small hole to the tip with a damp paper towel to help start the ink flow. Alternatively, if using the refillable cartridge push the clear end of the cartridge into the opening of the nib assembly until it clicks. Screw the inner shaft counter clockwise all the way down inside the cartridge. Now, dip the nib into an ink bottle and slowly turn shaft upwards (clockwise) to draw ink in until the reservoir is filled. Screw the nib assembly back into the barrel.
Roller Ball Assembly – Assembly of Body Barrel
- Line up and identify finished parts according to diagram A.
- Slip the “0” ring over the thread of the coupler into the groove.
- Press a coupler into each end of the barrel.
- Screw in the plastic end cap at either end.
- Drop the spring into the barrel. Remove the cover from the ink refill and insert the flat end inside the barrel. Screw on the tip over the point.
Fountain Pen Assembly – Assembly of Cap Barrel
- Press the cap nut, recess end first, into the flat end of the barrel.
- Press the centre band, square end first, over the exposed end of the brass tube to the wood. Use a drop of glue if necessary.
- Insert the threaded stud on the upper cap into the hole in the clip.
- Thread the assembly tightly in to the cap nut.
Operating the Pen
- The roller Ball Pen is ready to operate. A quick 1/4 turn will screw the ends together. When using the pen, screw the cap over the body end. Always keep the tip covered when not in use to avoid the ink from drying up.


